
Want to Make Extra Money Now?
|
You can start a blog for as cheap as $2.95 per month when you choose to host your blog on Bluehost which is the best web hosting provider if you want to start a self-hosted WordPress blog or site. Bluehost is one of the few web hosting companies recommended by WordPress.org to host self-hosted WordPress blogs.
Shortcodes Formats
So you’re interested in how to start a blog? I'm thrilled you are here! I created this blog, My Millennial Guide in 2015, while having no prior experience building websites whatsoever.
Since then, we've been featured on all of the popular news publications. It's been a thrill and I even appeared on live TV! Aside from the notoriety, blogging can bring you passive income on a daily basis and allow you to quit your job and blog full-time.
And, it's simple. It is possible to build websites as a beginner and pretty manageable. So since you are here, odds are that you want to create your own website or blog in order to make money blogging.
I'll go through the steps and it's really simple and can take you less than 20 minutes to complete the process. I use a WordPress site on Blue Host and it's really simple to set up even for beginners.
Why You Should Start a Blog (Even If You're Not a Writer)
- Make money while working from home. I started blogging at the beginning of 2015 and I can tell you first hand it is possible to make money blogging. So many bloggers do it as their full-time job! So why not give a shot? I started this blog and have put in hard work to get my site to where it is at today. I am still learning every day but it's really no risk at all and I enjoy doing it. Plus, now I do it full-time and have over 20 blogs that make me over six figures annually.
- Get more exposure for your existing business. A blog gives anyone, from individuals, Instagram fitness models, YouTubers, entrepreneurs, startup companies, or even large companies, the ability to reach a large number of people at very little cost. It's really easy to get your message out to a lot of people!
- Just write. Having to sit down once a day or a week (or at whatever frequency you do it) and write is an important skill. It forces you to learn the difficult lesson that some of the best things in life happen as a result of delayed gratification. Writing is one of those things, but there are others.
Do you see yourself in any of those? Can you see how you would benefit from a blog? Let’s get you up and running.
If you don't have time right now to set up your blog, you can sign up for my how to start a blog email course. It'll teach you how to start a successful blog and generate passive income within the first 30 days.
Sign up here for the free email course (how to start a successful blog):
Preface
The following steps outline exactly how I built my blog, My Millennial Guide. This guide will help you get started with your blog in less than 20 minutes.
When you’re done following these steps, you’ll have your self-hosted WordPress site.
4 Easy Steps:
- Purchase hosting
- Choose a domain
- Install WordPress
- Start using WordPress
PRO TIP: Get a free domain name with Bluehost – and the best possible price – through this promo link.
If you want to start a blog that makes money you are going to want to start one on Bluehost. Bluehost offers many advantages, including:
- Extremely Affordable – by using my link you get hosting for just $2.95 per month, which is less than $36 a year.
- Free Domain Name – you will get a free domain name when you sign up for hosting on Bluehost using this link.
- Extremely Easy WordPress Installation – Bluehost has a “one-click” WordPress installation
- 24/7 Tech Support – Bluehost tech support is available 24/7 and has been outstanding every time I’ve used them
- Attractive to Advertisers – having a self-hosted blog is attractive to advertisers and will make it easier to make money blogging
- 30-Day Money-Back Guarantee – if you cancel within 30 days you receive a full refund on your hosting service
- Extended Money Back Guarantee – if you cancel after 30 days you receive a prorated refund for the remainder of your hosting term
As you can see there are a ton of benefits of using BlueHost to start your blog. With their money-back guarantee, there is very little risk of starting a blog through BlueHost, and so much potential for making money blogging.
How To Set Up A Self Hosted WordPress Blog
Step 1: Find A Host
This is pretty straightforward.
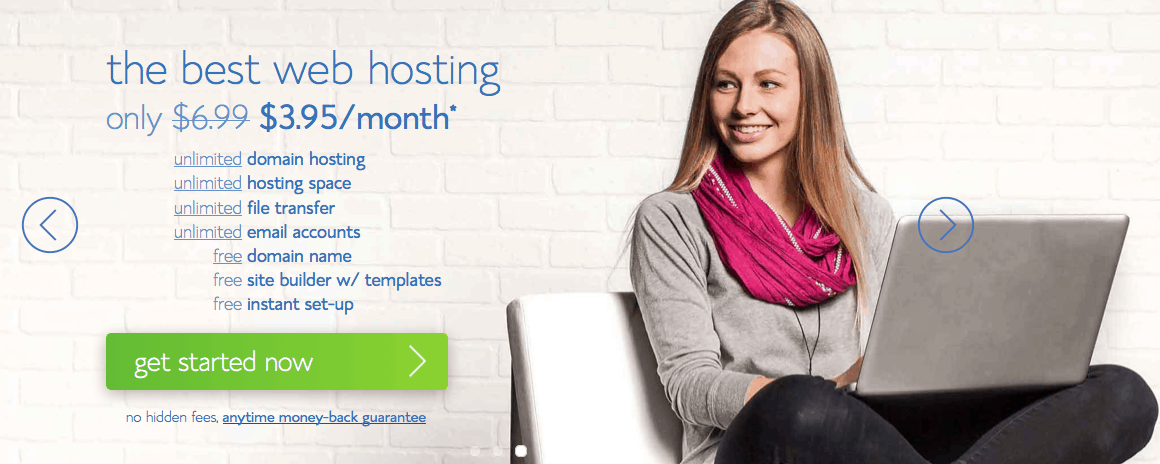
Go to BlueHost and hit ‘Get Started now.’
You're going want to get hosting for your blog/website. A host provides the server space for your site so others can find you on the internet. There are free service hosting sites out there, but I highly recommend you go for self-hosting.
There are just too many issues if and when your site becomes popular with non self-hosted sites. You should start out with a self-hosted site from the get-go. You get what you pay for, and ultimately free isn’t always free when it comes to time and aggravation. You’ll thank me later that you started out on the right platform.
How am I supposed to know any of these things, if I’m just starting out?
That’s what this guide is for. You can leave the browser tab open in the background.
| I recommend that you get yourself a free domain through BlueHost when you use my exclusive link. I can personally vouch for them as it is what I currently use to run this site and they have wonderful 24/7 customer service. |
Start by heading over to BlueHost. So, click the green Get Started Now button.
|
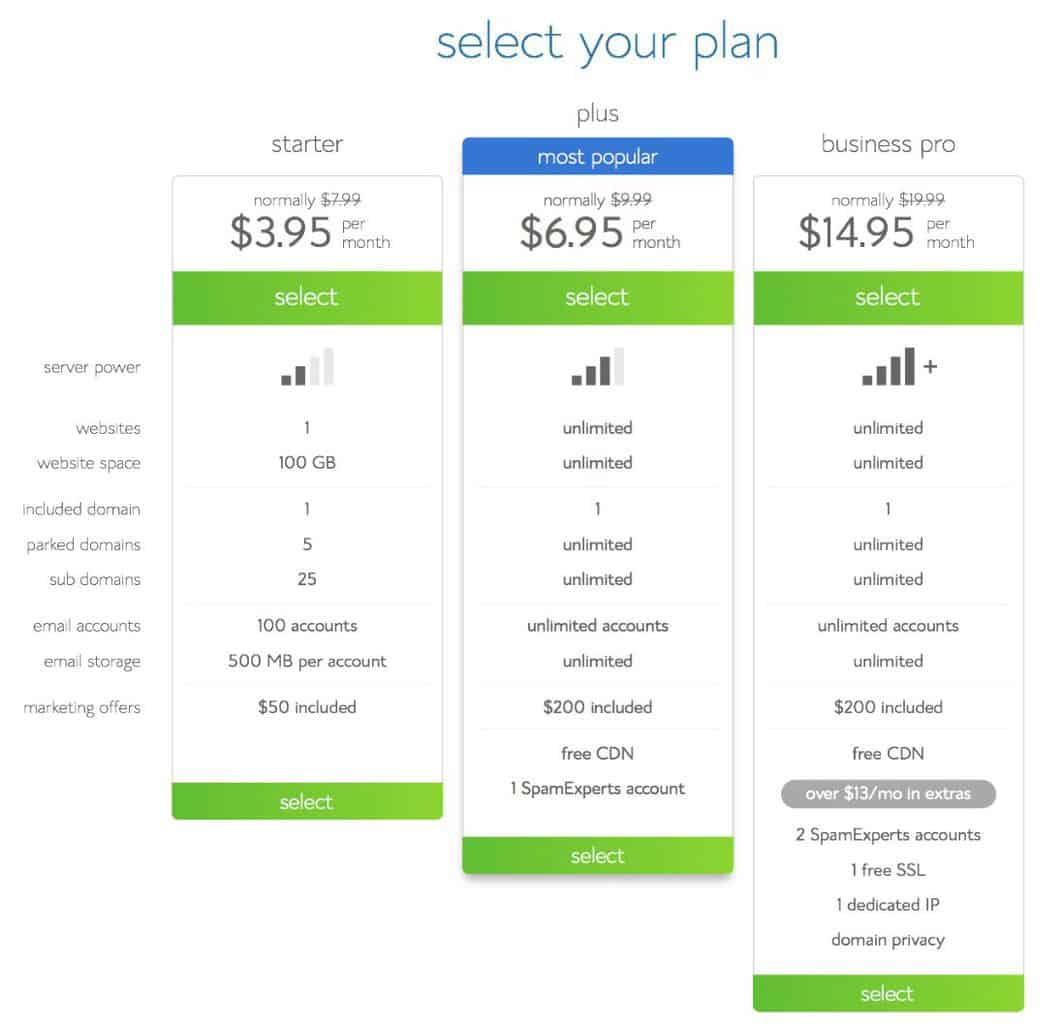
Step 2: Select Your Plan
Choose the plan you’d like to start with; you can upgrade at any time. If you’re confused as to what might be the best plan for you, give them a call to discuss your options. When starting a new blog, I recommend the Plus plan because you get more unlimited features.
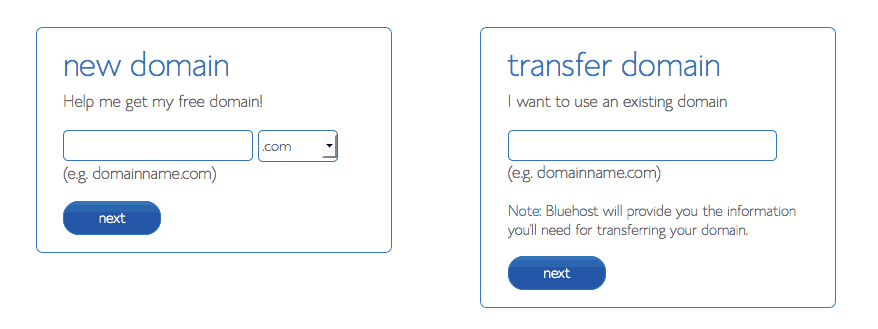
Step 3: Choose A Domain
Next, you need to select a domain name for your site. For example, my domain is https://www.mymillennialguide.com
If you already own a domain name, you can enter it here. You’ll have to go through a few extra steps to make sure you get your DNS pointed to Bluehost.
If you don’t already have a domain name, you can purchase one from the sign-up process. The best part – it comes free with your new hosting account when you use my link.
Here are a few things to consider:
- Go with a .com whenever possible
- Make it easy to spell
- Make it easy to say
- Don’t include hyphens, numbers, obscure terms or confusing string of words
- When in doubt, use your name to start
- Be creative
If you’ve already registered a domain name elsewhere, enter it on the right. This won’t mess up anything if you’re using a domain already; this only identifies your account.

 Click the blue Next button.
 Click the blue Next button.
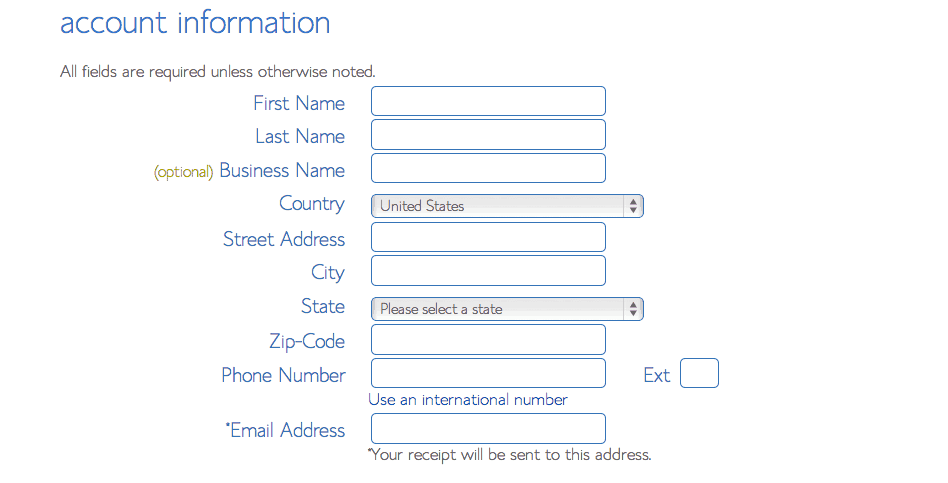
Step 4: Enter Your Account Information
On the next page, you’ll enter your contact information including your email address. The email you provide is where information will be sent to you regarding the set up of your account and your login information.
Step 5: Choosing A Hosting Package
Choose which hosting package you want. Normal, shared hosting is priced at 12, 24 and 36-month terms.
To help save you money, the longer term you purchase, the lower the monthly rate will be.
By choosing a 36-month hosting term, you can get the great introductory rate of $3.95/month.
Because you’ve chosen to host with Bluehost, if you ever need more than a shared hosting account, Bluehost provides seamless upgrades to VPS or dedicated server hosting accounts from inside your control panel.
You can always call them to discuss your particular website hosting needs.
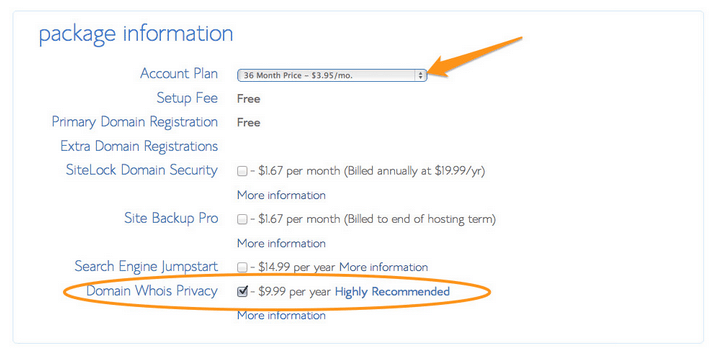
You’ll see a bunch of options which you can include at your discretion.
You'll want to add on Domain Whois Privacy, which is $9.99 per year, in order to protect your personal information online.
WHOIS privacy protection is a service to protect you from people finding your personal information in the WHOIS records. Buying into this will hide a domain registrant's personal information from public view to keep it private.
Step 6: Enter Your Billing Information
You're almost done with our how to start a blog guide! Just fill in your billing information, confirm that you’ve read the fine print and then click Next.
Step 7: Upgrades – Don't bother
On the next page, you’ll be asked if you want to add any upgrades. I did not bother with these. Continue to complete your purchase.
After completing your purchase, check your email. You’ll find a welcome email from Bluehost with your control panel (panel) login info.
Keep this information for future reference.
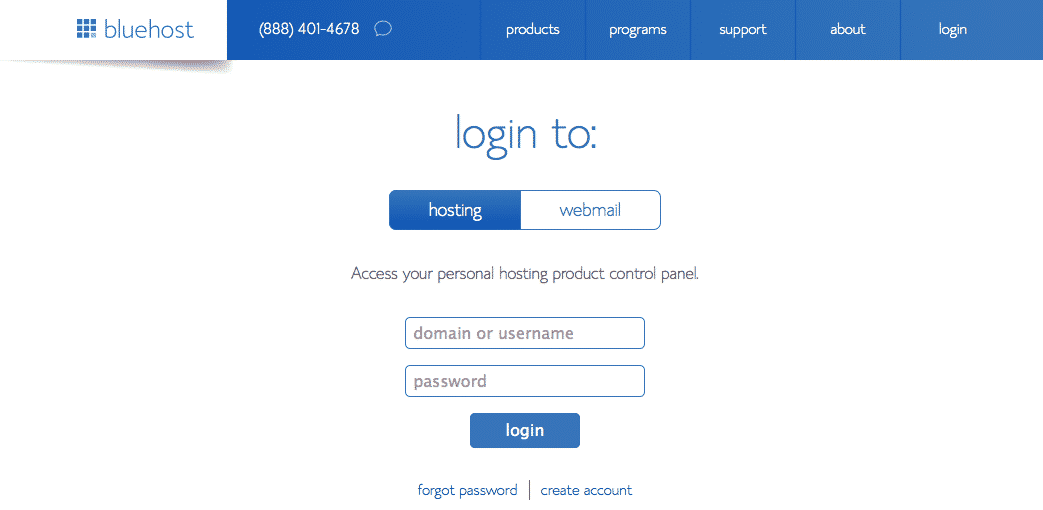
Step 8: Login To Your cPanel
Go back to Bluehost and click the Login button in the top right corner of your screen, or use the link to your cPanel contained in the welcome email.

Enter your cPanel login info from the welcome email.
Step 9: Install WordPress
Once logged in, click the WordPress icon under Website Builders.
Step 10: Start The WordPress Installation
Next, click the Start or Install button to begin the WordPress installation process.
Step 11: Choose Where To Install WordPress
Choose your domain from the drop-down menu.
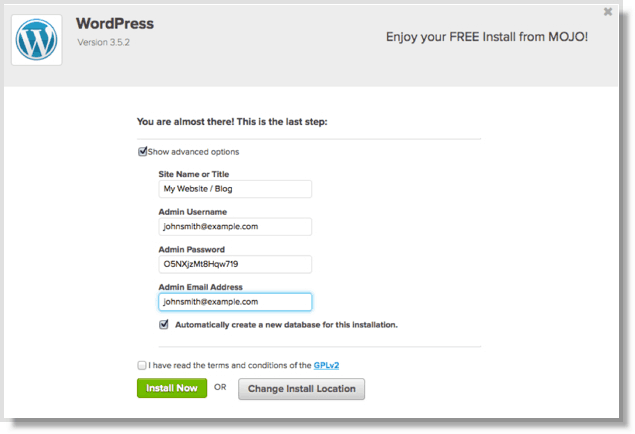
Step 12: Enter Your WordPress User Information
Check the box next to Show Advanced options. Enter your Site Name or Title (My Money Blog, My Fitness Blog, etc.)
Choose an Admin Username (do not use “admin” as your username) and password.
These will be what you use to login to WordPress once it’s installed.
Enter your email address, read and agree to the terms and click the Install Now button.
Step 13: Your WordPress Login Credentials
After WordPress has been installed, you should see the “Status: success” indication.
This is the information to access your new WordPress site. This information will also be sent to you via email.
If you registered a new domain in Step 2, clicking on the Site URL link will take you to your brand new, live website. Clicking on the Login URL link will take you to the WordPress login page where you can enter your username and password and get into the back-end of your WordPress site.
(If you transferred a domain in Step 2, see Optional Step 14 below.)
All done!
You can now type your domain into a browser, and your WordPress site will appear.
Optional Step 14: If You Used An Existing Domain
Your existing domain will not display your new site until you change your name servers wherever your domain is currently registered. Changing your name servers points your domain to this new site.
IMPORTANT! As soon as you change your name servers, your domain will bring visitors to this new site. Therefore, if you are currently using your domain on another site, do not change your name servers until your new site is set up and ready to go.
This is called migration. If you don’t know how to migrate your site to Blue Host, they have a program where they can do it for you. In the meantime, you can still access your new WordPress blog via a temporary URL. You may have received one in your welcome email from Blue Host. If you didn’t, simply call them and let them know you need a temporary URL for your new site.
To change the name servers where your domain is currently registered, first note your new Blue Host name server information:
- ns1.BlueHost.com
- ns2.BlueHost.com
Next, go to the registrar where your existing domain is currently registered (GoDaddy, etc.). You will need to enter the above information in the appropriate place. This varies among registrars so give them a call to help you walk through the process.
Congratulations! You now have your very own self-hosted WordPress website.
You can start a blog for as cheap as $2.95 per month when you choose to host your blog on Bluehost which is the best web hosting provider if you want to start a self-hosted WordPress blog or site. Bluehost is one of the few web hosting companies recommended by WordPress.org to host self-hosted WordPress blogs.
Questions?
I hope you find this how to start a blog guide useful. If you use this guide and get stuck – just email me. You can experience how easy it is to make money online through blogging. Another great way to get in touch with me is on Twitter here.


